
 Car
Car
 Van
Van
 Truck
Truck
 Pickup
 Tractor
 heavy equipment
 Motorcycle
 ATV
ATV
 Camper
 Classic Car
 Boat
Boat
 Tow Trailer
 Trailer


Learn how to install a sun visor in 30 minutes and immediately notice the difference in driving comfort and visibility. This practical guide helps you step by step! Suitable for beginners and experienced DIYers, with clear instructions, useful tips, and maintenance advice. Discover what to watch for during installation, how to determine the correct position, and how to keep the sun visor in top condition. Drive safely, comfortably, and stylishly.
Why install a sun visor?
Sun visors are a simple yet effective way to make your driving experience safer and more comfortable. They reduce sun glare, especially at sunrise or sunset. Studies show a sun visor can reduce exposure to harmful UV rays by up to 30%. Additionally, a sun visor gives your vehicle a modern and stylish look. This guide teaches you to install a sun visor in five simple steps, even with little experience.
The basic instructions are almost identical for different vehicles. We explain everything step by step so you can work with confidence.
Safety measures
Safety comes first when installing a sun visor. Park your vehicle on a level surface and turn off the engine to avoid accidents. Wear safety glasses when using a drill to protect your eyes from dust or splinters. Always read the manufacturer’s manual, as some sun visors have specific instructions. If you are unsure of your skills, especially when drilling, consider hiring a professional. This prevents damage to your windshield or frame.
➡️ Tip: Work in a well-lit area so you can clearly see all markings and attachment points.
Required tools and materials
Gather the following items beforehand to work efficiently:
- Sun visor: Check if the model fits your vehicle. Verify the model number in the manual or on the packaging.
- Screwdriver: For tightening screws. A medium-sized screwdriver usually works best.
- Drill: With a 3.5 mm bit for models requiring holes. Ensure the bit is sharp for accurate work.
- Measuring tape: For precise markings. A flexible tape is ideal for curved surfaces.
- Fasteners: Screws, rivets, or clamps, usually included with the sun visor.
- Cleaning cloth: Use a microfiber cloth with mild cleaner to remove grease or dirt from the installation area.
- Level: Optional, to check that the sun visor is straight.
Not sure which sun visor fits? Visit our sun visors page to choose the right one.
Step-by-step installation
Follow these five steps for proper installation. Take your time with each step to avoid mistakes.
Step 1: Preparation
Check if the sun visor is compatible with your vehicle. Compare the model number with the specifications in the manual or on the manufacturer’s website. Gather all tools and place them within easy reach. Clean the installation area with a microfiber cloth and mild cleaner to remove dirt and grease.
❗ Common mistake: Skipping cleaning can lead to loose brackets. Take a few minutes to do it properly.
Step 2: Positioning
Hold the sun visor against the windshield to determine the best position. Test different heights to ensure your view is not obstructed. Use a measuring tape for equal height on both sides. Mark drill points with painter’s tape and check with a level if the visor is straight.
➡️ Tip: Ask a friend to hold the sun visor or use temporary clamps/suction cups for precision.
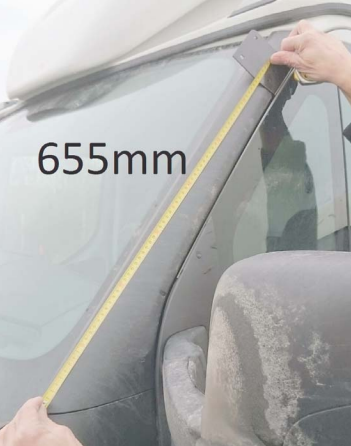
Step 3: Fastening
Carefully drill the marked points with a 3.5 mm bit if necessary. Follow manufacturer instructions for clamps or adhesive brackets. Check that brackets are securely fastened.
❗ Common mistake: Drilling too deep can cause damage. Drill only as deep as necessary.
Step 4: Mounting
Attach the sun visor to the brackets using the included screws or rivets. Align the visor carefully. Tighten screws firmly but gently. Check alignment with a level.
➡️ Tip: Loosely fasten all screws first so you can adjust if needed.
Step 5: Inspection
Ensure the sun visor is firmly attached and moves smoothly. Take a short test drive and check for unusual noises or movement. Inspect screws after long drives and then every six months.
❗ Common mistake: Skipping the test drive can leave issues unnoticed. Always test.
Video tutorial
Watch the installation process in this instructional video: how to install a sun visor. The video follows the same steps and offers extra visual guidance.
Tips for a successful installation
- ✅ Accurate measurements: Use a measuring tape and level for a straight installation.
- ✅ Avoid excessive force: Do not overtighten screws to prevent cracks.
- ✅ Check compatibility: Compare the model number with your vehicle.
- ✅ Professional help: Unsure about drilling? Let a professional assist.
- ✅ Use tape: Protect your vehicle from scratches during marking.
- ✅ Work in pairs: Ask someone to help for precise positioning.
Frequently Asked Questions
Have questions? Below are the most common questions about sun visors:
Can I install a sun visor on any vehicle?
Our sun visors are vehicle-specific. Always check that you have the correct visor for your vehicle. We have a wide range for many vehicle types.
How long does installation take?
With proper preparation, it takes about 20–30 minutes, depending on your experience and the type of sun visor.
Do I need special tools?
No, standard tools such as a screwdriver, drill, and measuring tape are sufficient. Some models may require a 3.5 mm drill bit.
What if I make a mistake?
Refer to the Troubleshooting section below or contact our customer service for help.
Can I install a sun visor on a leased vehicle?
Yes, but check your lease agreement. Some agreements prohibit permanent modifications. Consider alternatives if necessary.
Are there drill-free sun visors?
Yes, some models use clamps or adhesive brackets. These are easier to install but less secure for heavy vehicles.
Troubleshooting
Installation not going as planned? Here are solutions to common problems:
The sun visor is not secure
Check that all screws are tightened and brackets are aligned correctly.
The sun visor doesn’t fit properly
Compare the model number with your vehicle. Contact our customer service for a replacement if it doesn’t fit.
I drilled the wrong hole
Stop immediately and consult a professional. A wrong hole can compromise the safety of the sun visor.
The sun visor wobbles while driving
Check all fasteners and tighten any loose screws. Inspect bracket alignment if necessary.
Ready to start?
With this guide, you are ready to install your sun visor and improve your driving comfort. Don’t have a sun visor yet? Check our sun visors and choose from different styles and sizes tailored to your vehicle.
In addition to sun visors, we offer a wide range of car accessories to enhance your driving experience. Upgrade your vehicle with high-quality lights like spotlights, fog lights, and work lights for better visibility and a modern look. Explore exterior accessories like bullbars, sidebars, rearbars, or other styling accessories.
Whether you are a DIYer or want to upgrade your vehicle, we have everything to make your ride safer, more comfortable, and stylish. Contact us via our contact page or send a message via WhatsApp. Start today and transform your vehicle!
Sun visor maintenance tips
To keep your sun visor in top condition, follow these tips:
- ✅ Clean regularly: Use a soft cloth and mild cleaner to remove dirt and fingerprints.
- ✅ Check fasteners: Every six months, check screws and brackets are tight.
- ✅ Protect from heat: Avoid prolonged exposure to extreme heat, which can weaken the material.
- ✅ Inspect for wear: Regularly check for cracks or discoloration and replace if needed.
With proper maintenance, your sun visor will remain functional and attractive for years.